5 min reading time
How to Reduce the File Size of your eLearning Images
Have you ever launched a course to find that some of your course content images take a long time to render? It’s frustrating, right? Do you find that the file sizes of your courses are huge? To overcome this you need to reduce the size of the mixed media elements within your courses.
One quick way to achieve this is to use image compression to reduce the size of the images you are using.
In this post, we give you a basic explanation of image compression and share some of the best tools that make compressing images easy. And the tips and tricks we cover here can be applied outside of your training efforts too!
What is image compression?
Compressing images reduces the file size of an image. In doing so, it changes the characteristics of the image itself. If your SCORM files or PowerPoint presentations are too large in file size, image compression will allow you to reduce some of the bulkier elements, helping to bring down the overall size.
Without going into a huge amount of detail it’s important to note that a basic rule of thumb applies. Think of it as a slider. On one side you have quality and on the other, you have a reduction in file size. The more you compress an image the more you’ll lower the quality of that image.
Why compress images?
There are a number of reasons why compressing your eLearning images is a good idea. File size restrictions, the speed at which images render on a webpage, the end user’s network speed, and the retention of learner interest.
File size
The primary reason for image compression is to reduce the file size of the image. Most people will encounter compression when they are faced with the problem – “the file is too large to upload”. That’s a simple problem to solve. Compress the image until it falls below the maximum size allowed by the website you are using. And the image will also upload faster!
Network speed
The secondary effect of image compression is actually more important. By reducing the size of the file you’re speeding up the time it takes for the image to render on a webpage. The faster a page loads the better the experience the end-user, or in this case your learner, has. The critical thing to consider is the various scenarios where an end-user may be requesting access to a webpage.
You should put your high-speed office network to one side for a moment. Your large hi-fidelity images load immediately in that space. But what about when a learner is launching a course with 3g during their commute, or on free wifi in a cafe. The sluggish rendering of those non-compressed images is going to create frustration and potentially lead to greater levels of learner abandonment.
Engagement
The faster the pages load on a website or an application the better. This is especially true for eLearning. Faster loading times help to retain interest. If you’ve successfully captured the attention and interest of your learners the last thing you want is to lose it due to a slow loading image.
Resizing
Sometimes you don’t even need to compress the image! The image dimensions, the size you see rather than how many bytes are involved, may be the source of the large file size. If this is the case you can reduce the dimensions of the image without compromising on image quality.
For example, the optimal size of a Facebook profile picture is 360 x 360 pixels. So if you had an image that is 3600 x 3600 pixels you could simply resize the image to the desired dimensions and as part of that process, the file size would be reduced.
Here’s an example to help make things as clear as possible:
- The original image on the left was 5616 x 3744 pixels and the size was 2.5mb
- The new image, shown on the right was 2000 x 1333 pixels and the size was 242kb
As you can see, this significantly reduces the file size. It’s important to check the size of the image you need to use to make sure you’re not unnecessarily using an overly large image. If the dimensions are correct but the file size is still too large it’s time to look into compressing the image.
The best way to resize an image is with Photoshop. Alternatively, you can use the Preview tool on a Mac. If you need access to a free online tool you can’t go wrong with Canva’s image editor or Webresizer, the latter is great for resizing multiple images at once.
Image Compression
If after resizing the image you still need to reduce it’s file size, it’s time to tackle image compression. Firstly, it’s important to know the difference between the two common types of image compression; lossless and lossy. They both reduce the file size but differ slightly in how they achieve it, and the quality of the results.
With Lossless compression, the algorithm being used reduces the file size of an image without losing any of the data that makes up the image. The compressed image is an exact copy. This makes it possible to reconstruct the original image from the compressed image. This perfectly recreates the image but is limited in the amount of reduction possible.
Lossy compression, on the other hand, leaves you with a version of the image that is slightly simplified. This option allows you to reduce the size of the image more than lossless compression, but it comes with a penalty in terms of quality. You cannot reconstruct the original image using the compressed one simply because there are more bits (or bytes) missing.
For example, the image below has gone through a process of lossy compression reducing the file size by 80%. As you can see this has negatively affected the quality of the image on the right.
Here’s a list of handy web-based tools that you can use to compress images:
- https://compressor.io/
- https://tinypng.com/
- https://imagecompressor.com/
- https://kraken.io/web-interface
- https://www.giftofspeed.com/jpg-compressor/
- https://www.imagerecycle.com/
Before you start, check the size of your image by right-clicking on it and clicking the Properties (Windows) or Get Info (Mac) option. There you’ll see how many KB or MB the image is.
Compressing images with an authoring tool
If you’re creating SCORM or xAPI courses with an authoring tool, the tool’s settings are used to reduce the size of the files. This means that all of the media in the course is compressed instead of compressing each individual image. Although convenient, this is a heavy-handed approach, as it reduces the file size of everything in the course. As we’ve outlined before, this reducing of size comes with a reduction of quality. Sometimes it’s better to manually choose specific images to reduce.
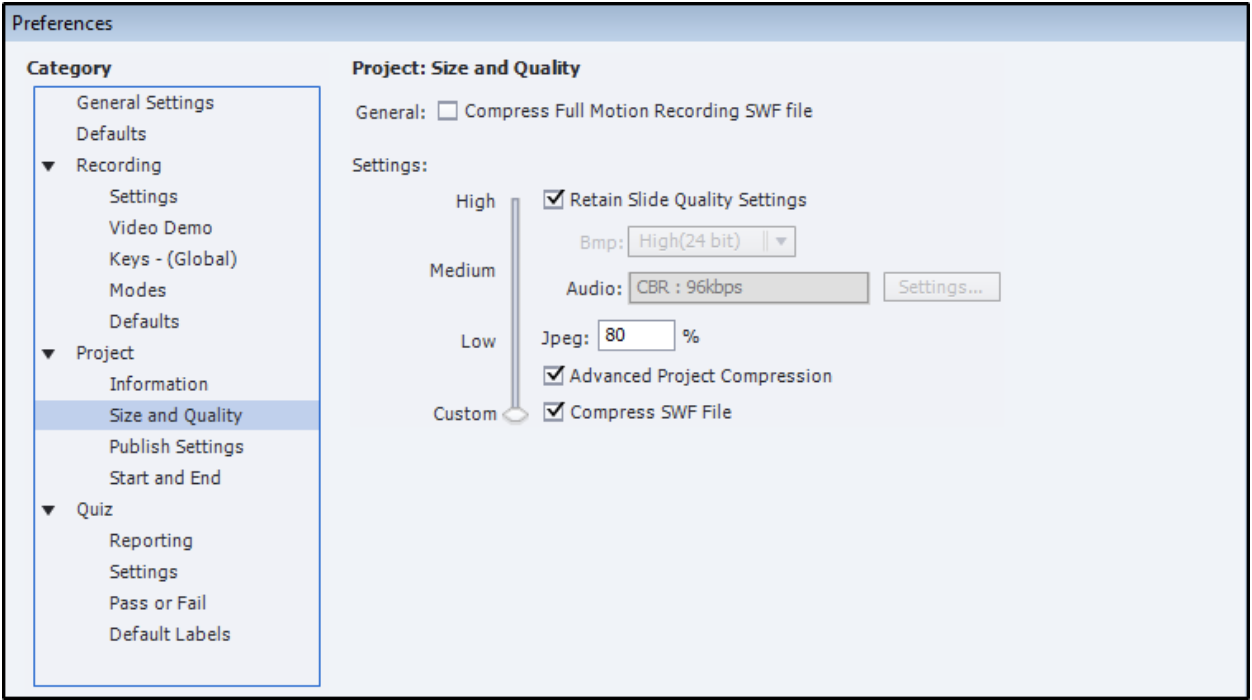
Here’s a basic guide to reducing the size of courses in Adobe Captivate and Articulate Storyline.
Adobe Captivate:
Select Edit > Preferences > Project > Size And Quality (Windows) or Adobe Captivate > Preferences > Project > Size and Quality (Mac OS)

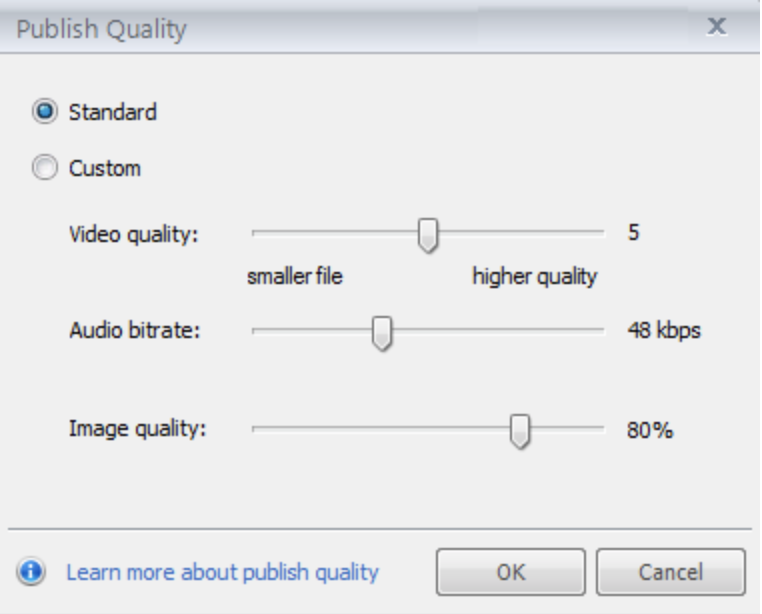
Articulate Storyline:
In the publish settings, under quality, you can adjust the size of the video, audio, and image quality. Simply use the slider to reduce the image quality. You should test the course to ensure that you’re happy the quality hasn’t been reduced too much and readjust the publish quality settings as required.

By resizing or compressing your images you can reduce the overall file size of your eLearning courses, presentations and even your website pages (which is great for SEO).
This leads to faster loading time and less frustration for your learners. By following a couple of steps you can make sure that your courses will load faster no matter where your learners are!


